Table of Contents
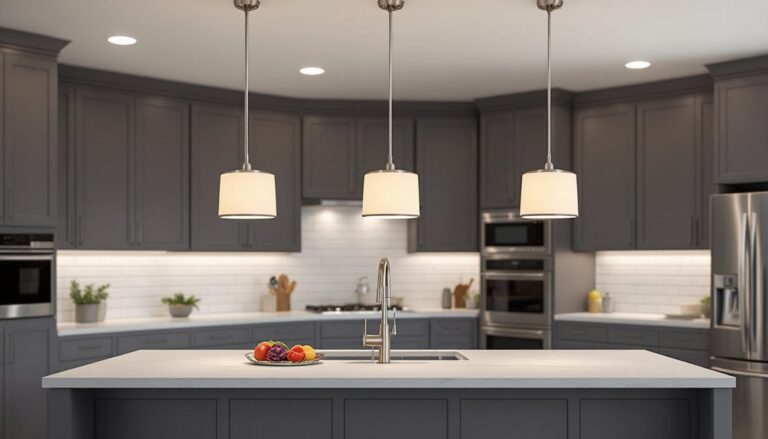
TogglePendant lights hang above a kitchen island like sculptural centerpieces, they’re functional task lighting, yes, but they also define the whole room’s personality. Whether you’re building an island from scratch or refreshing an existing one, choosing the right pendant fixtures is more than picking something that looks good on Instagram. It’s about understanding what size works over your counter, how much light you actually need, and whether your electrical rough-in can handle the load. This 2026 guide walks you through modern pendant styles, sizing math, brightness specs, and the electrical setup so you can tackle installation with confidence.
Key Takeaways
- Modern pendant lighting for kitchen islands combines task lighting with design impact, requiring careful attention to size, height, and electrical setup before installation.
- Position pendants 30–36 inches above the countertop with each shade 10–15 inches in diameter, spaced at least 12 inches apart, to avoid glare and cramped aesthetics.
- Aim for 150–300 lumens total brightness with 3500–4100K color temperature to balance crisp prep work visibility with a warm, inviting atmosphere.
- Island electrical rough-ins require wall-to-island conduit protection and often need building permits; confirm your junction box is UL-rated for pendant weight before hanging fixtures.
- LED bulbs with CRI 90+ and dimmers offer long-lasting, reliable task lighting and allow you to adjust ambiance from cool (4000K) during prep to warm (2700K) for entertaining.
- Choose from minimalist industrial styles with matte-black finishes, mid-century brass designs with sculptural appeal, or wood-accented industrial fixtures trending in 2026 for personality-driven kitchen aesthetics.
Why Pendant Lighting Works Best For Kitchen Islands
Island pendants do something no other light fixture can: they hover right where you actually work. Unlike a flush-mount ceiling light that floods everything equally, pendants drop down to cast focused, shadow-free light on your prep surface. They’re suspended by cord, chain, or rigid rod, and that flexibility means you can dial in the exact height to avoid glare and illuminate cutting boards or stovetops without obstruction.
From a design angle, pendants act as jewelry for your kitchen. They sit at eye level when you walk into the room, so they carry visual weight that other fixtures don’t. A set of three sleek pendants can anchor an entire island design scheme, pulling together colors, materials, and mood in one stroke. They also create layers of light: ambient ceiling light, task light from the pendants, and often under-cabinet lighting below. This layering is key to modern kitchen design: no single source of light should do all the heavy lifting.
Electrically, islands present a unique challenge. Unlike pendant clusters over a dining table, kitchen islands sit far from walls. Your rough-in needs to drop from the ceiling directly above, or you’ll need an underfloor raceway or conduit running along the subfloor, both of which require careful planning and sometimes permit approval. The upside: because islands are a discrete zone, you can install pendants on a single circuit with a dimmer, giving you complete control over light levels during cooking, dining, or entertaining.
Popular Modern Pendant Styles And Materials
Modern pendant lighting spans a spectrum, and choosing a style depends on your kitchen’s overall aesthetic and how much visual pop you want.
Minimalist And Industrial Designs
Minimalist pendants strip away decoration. Think a single bare Edison bulb in a cage frame, or a smooth matte-black dome that vanishes against a dark ceiling. These work brilliantly over islands in kitchens with clean lines, open shelving, and neutral palettes. Materials stay simple: metal frames (often steel or cast iron), sometimes with a frosted or clear glass shade. Industrial designs, heavier, darker, with exposed hardware, pair perfectly with concrete countertops, steel appliances, and reclaimed wood. Look for fixtures with adjustable height cords and articulating arms if you want that workshop feel without sacrificing style.
Wood-accented industrial is trending hard in 2026: expect to see metal frames paired with solid wood or veneer elements, usually walnut or white oak. These give warmth to an otherwise stark industrial look. When shopping, avoid fixtures where the wood looks paper-thin or veneered onto particleboard, it won’t age well.
Mid-Century Modern And Sculptural Options
Mid-century designs reference the 1950s–60s era: tapered drums, atomic sunburst shapes, and sculptural curves. Brass and cooper finishes are everywhere in mid-century modern: they complement warm wood cabinetry and marble countertops. A trio of sculptural pendants, each one a mini statement, can feel curated and intentional rather than matchy-matchy.
Dwell and design-forward publications have been championing sculptural pendants that look more like art than fixtures: bubble glass, hand-blown ceramic, or molded resin shades in unexpected colors (sage green, terracotta, soft gray). These tend to cost more because they’re often artisan-made, but one striking pendant over an island can justify the investment. Pair one sculptural fixture with minimal industrial decor elsewhere and you’ve got balance. Go full sculptural and the kitchen feels design-forward: go minimalist everywhere and you risk sterile.
Sizing, Height, And Spacing Guidelines For Your Island
Island width. Your pendant spread should not exceed two-thirds the length of your island countertop. For a typical 36-inch-wide island, three pendants roughly 12 inches apart from center to center works well. For a longer 48-inch island, four pendants spaced 12–14 inches apart prevents overcrowding. If your island is very narrow (under 30 inches), skip the trio and go with a single statement pendant centered, or two smaller ones.
Pendant diameter. Each shade should be roughly 10–15 inches in diameter. Bigger shades (18+ inches) work solo or as a pair, but three huge pendants above a residential island look more like a commercial kitchen. Measure the clear distance from shade edge to shade edge: 12 inches of air between fixtures minimum keeps them from feeling cramped.
Hanging height. This is where most DIYers stumble. You want the bottom of the shade 30–36 inches above the countertop, measured from the lowest point of the fixture. Too high and the light scatters: too low and you’ll clip your head while standing. If your island has seating on one side, drop them another 2–3 inches to avoid sightlines that block conversation. A 7-foot-8-inch ceiling is standard in newer homes: if yours runs 9 feet or taller, you have more breathing room.
If you’re ordering from Home Depot Overhead Lighting or other retailers, confirm whether the fixture height includes the canopy (the ceiling-mounted housing) or just the shade. Measure twice, order the correct cord or stem length, and keep your receipt. Most suppliers offer adjustable or cut-to-length cords so you can tweak height after installation, a lifesaver if your ceiling isn’t perfectly level.
Lighting Brightness And Color Temperature Recommendations
Kitchen islands demand adequate light for food prep. Aim for 20–40 lumens per square foot over the work surface. For a typical 36×24-inch island, that’s roughly 150–300 lumens total from your pendants. Most quality pendant fixtures come with E26 sockets (standard US base) and accept bulbs from 40W incandescent equivalent (400 lumens) up to 100W equivalent (1600 lumens). Three 60W-equivalent LED bulbs (about 800 lumens each) deliver plenty of task light without harsh shadows.
Color temperature matters more than many homeowners realize. Measured in Kelvin (K), cooler light (4000–5000K) is crisp and alerting, great for detailed prep work. Warmer light (2700–3000K) is cozy but can make vegetables look dingy. The sweet spot for kitchen task lighting is 3500–4100K: energetic enough for accuracy, warm enough to feel inviting. Dimmers let you shift the vibe: dial down to 2700K in the evenings for entertaining, crank to 4000K during meal prep.
LED bulbs dominate now, and for good reason. They last 25,000–50,000 hours, run cool, and produce consistent color. Avoid cheap big-box LEDs with poor color rendering index (CRI): you want CRI 90 or higher so colors, especially food, look true. Smart bulbs (WiFi-enabled dimmers built into the bulb) are tempting but add cost and complexity: a simple wall dimmer with standard LED bulbs is more reliable long-term.
Installation Tips And Electrical Considerations
Before you buy, inspect your island’s ceiling rough-in. Pendant fixtures require a ceiling box with a good support brace, not a flimsy pancake box or a light fixture box rated for only 50 pounds. Most modern pendant kits come with a mounting bracket that bolts to a standard octagonal or round junction box hung from a 1/2-inch rod or hickey. Confirm your existing box is UL-rated for the pendant weight: heavier sculptural pieces need robust hardware.
Electrical wire running to the island must be protected in 1/2-inch EMT conduit or buried in the slab (for concrete floors) if it crosses open space. This is where codes vary sharply by region: some jurisdictions allow surface-mounted conduit, others require underfloor or above-joist runs. Check your local IRC (International Residential Code) or call your building department before roughing in. Many jurisdictions require a permit for island pendant installation, not because pendants are inherently dangerous, but because your wiring path and support need inspection.
For installation, follow these steps:
- Turn off power at the breaker and confirm the circuit is dead with a non-contact voltage tester.
- Remove the old fixture (if replacing) and carefully support the junction box with your hand or a brace, don’t let it drop into the ceiling cavity.
- Strip 3/4 inch of insulation from the hot, neutral, and ground wires using wire strippers.
- Connect wires using wire nuts: hot to hot (usually black to black), neutral to neutral (white to white), and ground to ground (copper or green to copper or green).
- Push the wired junction box up into the ceiling cavity and secure the canopy with provided screws.
- Thread the pendant cord or stem through the canopy and attach the shade per manufacturer instructions.
- Insert and test your bulbs before finishing: if the light doesn’t turn on, check connections and breaker.
Safety gear: Wear safety glasses (dust and debris fall), work gloves, and if you’re working in an older home where insulation is degraded, a dust mask. Ladder safety is critical: use a sturdy step ladder or extension ladder on level ground, and have someone spot you if possible.
Modern Home Office Lighting and other residential spaces often benefit from dimmers, which require a dimmer-rated fixture and dimmer-compatible LED bulbs. Check your pendant’s spec sheet: not all fixtures work with dimmers due to internal electronics. If you’re installing a dimmer switch, that’s a separate project, run 14-gauge or 12-gauge wire per code, and test before closing walls.