Table of Contents
ToggleKitchen island pendants do far more than light up your countertop, they anchor the entire room’s visual hierarchy and set the mood for everything from weeknight dinners to entertaining. The right fixtures balance form and function, providing task lighting where you need it while acting as a design statement that ties your kitchen together. Whether you’re renovating or refreshing, understanding how to choose and install kitchen island lighting pendants makes the difference between a space that feels incomplete and one that shines. This guide walks you through selecting, sizing, and styling the perfect pendants for your island.
Key Takeaways
- Kitchen island pendants serve dual purposes as both task lighting and design focal points, anchoring your room’s visual hierarchy and setting the overall mood.
- The number of pendants depends on island length: use one pendant for islands under 36 inches, two for 36–48 inches, and three or more for islands over 48 inches.
- Proper spacing and height matter—hang pendant bottoms 30–36 inches above countertop on standard 8-foot ceilings, and space multiple fixtures 24–36 inches apart for balanced visual rhythm.
- Choose fixtures rated 2700K–3000K for warm inviting light or 3500K–4100K for task-focused brightness, aiming for 600–800 lumens per pendant to safely handle food prep and daily use.
- Fixture finish and material should complement existing kitchen hardware, whether brushed nickel, matte black, aged brass, or glass, to create cohesive design throughout your space.
- Hardwired installation into solid ceiling framing with a dedicated circuit is essential for safety and building code compliance—hire a licensed electrician if new wiring is required.
Why Kitchen Island Pendants Matter More Than You Think
Most homeowners treat kitchen island lighting as an afterthought, a fill-in once the cabinets are set and countertops installed. That’s a mistake. Pendants function as both primary task lighting and a primary focal point, which means they’re doing double duty in a way few other fixtures can claim.
Task lighting over an island needs to be strong enough to safely handle food prep, reading recipes, or assignments sessions. Ambiance matters too: poorly lit islands feel cold and uninviting, while well-lit ones encourage gathering. Kitchen island pendants also anchor the kitchen’s proportions. A 48-inch island with overhead track lighting looks disconnected, but three thoughtfully-spaced pendants create visual rhythm and balance.
Think of pendants as jewelry for your kitchen. They’re visible, they make a statement, and they’re one of the easiest ways to refresh a tired kitchen without a full remodel. Modern pendant designs range from industrial metal to soft sculptural forms, minimalist glass to bold statement shades, all while delivering the lumens you actually need.
Types of Pendant Lights for Kitchen Islands
Pendant styles break down into several categories, each with practical strengths.
Traditional Glass Domes and Shades work in almost any kitchen. Clear glass, frosted glass, or colored glass shades soften light while showing off a stylish bulb or decorative hardware. They’re versatile, easy to clean, and won’t clash with future decor changes.
Metallic and Industrial Fixtures (brushed nickel, matte black, aged brass) suit modern, farmhouse, and transitional kitchens. These typically have minimal shading, so light spreads broadly across your work surface. They’re durable and handle moisture well in active kitchens.
Sculptural and Artistic Pendants come in ceramic, rattan, or blown glass forms and work best as statement pieces in kitchens with cohesive design already in place. They look stunning but demand thoughtful sizing so they don’t overwhelm the space.
Recessed or Slim-Profile Fixtures are the workhorse choice for tight ceiling clearances or smaller islands. They provide clean, efficient light without visual bulk.
Each style delivers light differently. Glass domes scatter light softly: industrial shades direct it more. Know what you’re getting before you buy, a beautiful frosted glass shade won’t work if you need bright, focused task lighting.
Single vs. Multiple Pendants: What Works Best
This depends on island length and ceiling height. A single pendant works best over islands under 36 inches long or in kitchens with very low ceilings (7 feet or less). One fixture minimizes visual clutter and is easier to wire.
Two pendants fit islands 36 to 48 inches long and feel balanced without creating a gap between fixtures. Space them 12 to 18 inches from the island’s edges.
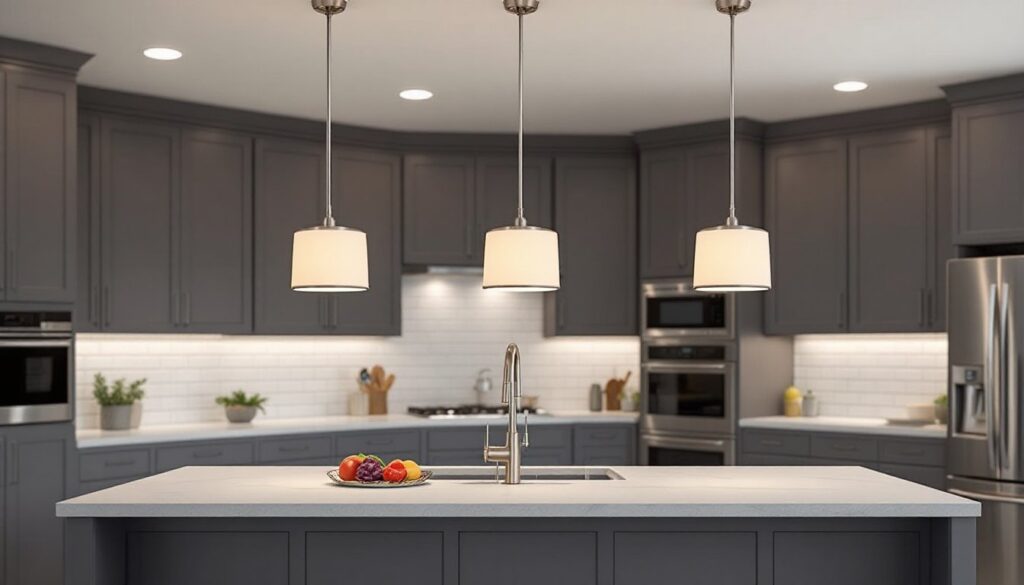
Three or more pendants suit islands over 48 inches. Install them with equal spacing, typically 24 to 36 inches between pendant centers depending on your ceiling height and fixture size. Oversized single fixtures on long islands look disproportionate and cast shadows.
Remember: more fixtures means more wiring and potentially more junction boxes. Simple is often smarter, but don’t force one oversized pendant onto a long island just to avoid installation complexity. The visual result suffers.
Key Factors to Consider When Selecting Pendants
Island Length and Width determine pendant count and spacing. Measure your island carefully before shopping. A 42-inch island works best with two fixtures: a 60-inch island needs at least three. Pendant size should relate proportionally, oversized 16-inch shades look wrong on a petite 36-inch island.
Ceiling Height is critical. Standard recommendations place pendant bottoms 30 to 36 inches above the countertop (12 inches below typical 8-foot ceilings). If your ceiling is only 7.5 feet, you might need slim-profile fixtures or pendant heads mounted flush to avoid bonking heads. Conversely, vaulted ceilings let you hang pendants lower for cozier ambiance.
Bulb Type and Brightness matter for function. Look for fixtures rated 2700K to 3000K for warm light that feels inviting, or 3500K to 4100K if you want brighter, more neutral tones for task work. LED bulbs are now standard: they’re efficient and last years without replacement. Aim for 600 to 800 lumens per pendant over a work island. If you have three pendants, 1800 to 2400 lumens total should let you prep food safely without additional ambient light. Dimmable bulbs and fixtures let you adjust mood later.
Finish and Material should complement your kitchen’s existing hardware and cabinetry. Brushed nickel mixes easily: matte black or aged brass make bolder statements. Glass and ceramic are easier to keep clean than fabric shades in a cooking zone.
Power Source and Control affect installation difficulty. Hardwired fixtures require running electrical through your ceiling joists and often a junction box, structural and electrical work. Plug-in pendant options exist but look awkward in most kitchens. Most kitchens work best with hardwired fixtures on a dedicated circuit controlled by a wall switch or dimmer. If your kitchen doesn’t have a dedicated circuit over the island, you’ll need an electrician to add one safely.
Installation Tips and Height Guidelines
Installation difficulty depends on your existing electrical infrastructure. If your kitchen has a junction box over the island already, swapping fixtures is a weekend job. If not, you’re running new circuit runs, professional work in most cases.
Installation Steps (Assuming Power Already Exists)
- Turn off power at the breaker and verify with a non-contact voltage tester.
- Mark pendant positions on the ceiling. For two fixtures on a 42-inch island, center them 18 inches from each edge. For three on a 60-inch island, space centers 20 inches apart, centered over the island.
- Install ceiling-mount hardware (usually a mounting bracket and cross-brace) into framing. Use lag bolts into joists, not just drywall, pendants weigh 5 to 15 pounds each, and drywall anchors will fail.
- Connect wires: typically black (hot) to black, white (neutral) to white, and bare copper (ground) to green or bare at the fixture. Use wire nuts rated for your wire gauge.
- Secure the fixture body, install shades or diffusers, and add bulbs.
- Restore power and test.
Height Guidelines:
- Standard 8-foot ceiling: Hang pendants 30 to 36 inches above countertop (pendant bottom roughly 20 to 26 inches below the ceiling).
- Vaulted or cathedral ceiling: You have more freedom: hang lower (12 to 18 inches below peak) for coziness, or higher for a lighter feel.
- Low ceiling (7.5 feet): Use slim-profile fixtures or recess-mount options: aim for pendant bottoms 30 inches above the counter as a minimum.
Adjust based on sight lines. You don’t want diners at the island staring directly into a bulb. A 12-inch shade diameter typically clears line-of-sight for seated diners from a standard countertop height.
Safety Notes: Always wear safety glasses when working overhead. Use a sturdy ladder or step stool, never a chair. If you’re unsure about electrical work or ceiling framing, hire a licensed electrician. Hanging heavy fixtures into unbraced ceiling joists or drywall risks injury and code violations. Building permits are often required for new electrical circuits: check your local jurisdiction.
Styling Your Kitchen Island Lighting for Maximum Impact
Once fixtures are installed, styling is about proportion and cohesion. Fixture size should visually balance the island. A 36-inch island with three 18-inch pendants will look blocky: three 10-inch fixtures feel right. Conversely, a 60-inch island with three 8-inch pendants looks skimpy.
Consider how pendants relate to other kitchen lighting. If you have recessed can lights in the ceiling, pendants should complement, not compete. A mix of warm pendant glow and cooler recessed light creates layered, flexible illumination. Dimmer switches let you balance the two based on the moment.
Color and Material Choices set tone. Warm brass or copper pendants above a dark island countertop create moody elegance. Clear glass over white subway tile feels bright and contemporary. Rattan or woven shades soften light and introduce texture, great in transitional or farmhouse spaces. If your kitchen has brass hardware on cabinets, brass pendants echo that. If it’s stainless steel and glass, matte black or chrome fixtures feel cohesive.
Don’t overthink it. Kitchen island pendants should feel like a natural part of your kitchen’s story, not a showpiece that hijacks the room. When in doubt, look to your favorite kitchens online or in magazines, whether it’s inspiration from The Kitchn, design-forward selections on Remodelista, or carefully curated options on Houzz, you’ll spot patterns in what resonates with your aesthetic.
If you’re pairing pendants with other Home Depot Overhead Lighting or exploring adjacent spaces like a home bar, consistency in finish and brightness creates flow throughout your home. The same brushed nickel or matte black that works over your island can extend to Lighting for Home Bar setups, tying your kitchen and entertaining spaces together visually.
Conclusion
Kitchen island pendants are an investment in both function and beauty. Choose fixtures that deliver adequate lumens, suit your ceiling height, and reflect your kitchen’s design direction. Install them safely into solid framing, space them properly across your island, and let them become the lighting centerpiece that makes your kitchen work harder and look better. With the right pendants, your island transforms from a functional workspace into a room anchor that guests notice and homeowners love.