Table of Contents
ToggleKitchen lighting isn’t one-size-fits-all. A single overhead fixture might work for cooking prep, but it won’t create the inviting atmosphere you want when guests arrive, nor will it provide enough focused light at the countertop where you’re reading a recipe. The best lighting for a kitchen combines three distinct layers, ambient, task, and accent, to handle every job from chopping vegetables to setting a mood. This guide walks you through building a kitchen lighting plan that actually works, covering fixture types, color temperatures, placement strategies, and the practical details that separate a well-lit kitchen from one that feels either too bright or too dim.
Key Takeaways
- The best lighting for a kitchen requires three distinct layers—ambient, task, and accent—working together to provide safe navigation, focused work visibility, and atmospheric depth.
- Ambient lighting should provide 4 to 6 watts per square foot of coverage using multiple smaller fixtures rather than one large source to avoid harsh glare and shadows.
- Task lighting should be 30 to 40% brighter than ambient light, with under-cabinet LED strips and pendant lights above islands being the most effective and affordable upgrades.
- Match color temperature to purpose: use 3000K–3500K neutral white for general kitchen lighting and 4000K cool white for task areas to accurately distinguish food colors and eliminate shadows.
- Proper fixture placement, height, and dimmers are essential—recessed lights at multiple angles prevent shadows, pendants should hang 12 to 20 inches above counters, and dimmer switches enable flexible lighting modes for cooking, entertaining, and everyday living.
- Test light positions with temporary lamps or a flashlight before committing to installation to avoid costly mistakes and ensure your kitchen lighting layout actually meets your needs.
Understanding Kitchen Lighting Layers
Ambient Lighting
Ambient lighting is your kitchen’s baseline, the general illumination that fills the entire space. It’s what lets you navigate safely and see the room without squinting. Ambient light typically comes from ceiling-mounted fixtures or recessed lights spread evenly across the kitchen. The goal is consistent, shadow-free coverage without harsh glare.
Most kitchens need 4 to 6 watts per square foot of ambient light to feel well-lit. A 10-by-12-foot kitchen (120 square feet) should have between 480 and 720 watts of total illumination. That doesn’t mean one massive 700-watt fixture, it means layering smaller sources. Recessed downlights spaced 4 to 5 feet apart, a central flush-mount fixture, or a combination of both work well. For Home Depot Overhead Lighting:, popular ambient options range from basic builder-grade panels to more designer-forward semi-flush fixtures.
Dim your ambient lights slightly when accent or task lighting is on. You don’t want everything at full brightness: that defeats the purpose of layering and wastes energy.
Task Lighting
Task lighting focuses bright light on specific work zones, the countertop where you prep food, the stove where you cook, the sink where you wash dishes. Without proper task lighting, you’ll end up casting shadows over your own workspace while reaching for a cutting board.
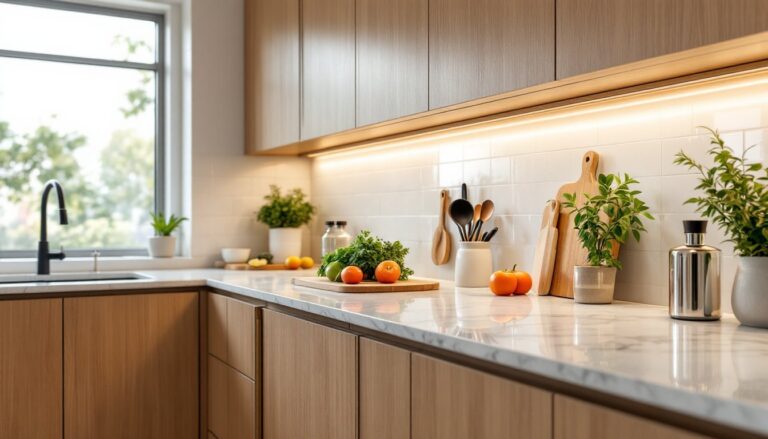
Common task lighting fixtures include under-cabinet lights, pendant lights above islands or peninsulas, and directional track lights. Under-cabinet lighting is often the first upgrade homeowners make and for good reason: LED strip lights are affordable, easy to install, and eliminate shadows cast by your own body. Pendant lights above an island serve double duty, providing both task light and a subtle design accent. If you’re retrofitting an older kitchen, pendant lights are simpler to install than recessed fixtures, which require cutting into joists and running new electrical runs.
Task lighting should be 30 to 40% brighter than ambient light. If your ambient layer is 500 lumens (a measure of light output), aim for task fixtures around 700–1000 lumens. This creates comfortable, shadow-free visibility without overwhelming the eye.
Accent Lighting
Accent lighting highlights architectural features, artwork, or decorative elements. A recessed light aimed at an open shelving unit, a spot light on a backsplash, or a low-voltage rail accent over a wine rack adds visual interest and depth. Accent lighting isn’t essential to cooking, it’s the polish that makes a kitchen feel intentional.
Accent fixtures are typically 10 to 15% of your total lighting output. They work best when dimmed and should never be your only light source. Many homeowners skip accent lighting in kitchens, and that’s fine: focus first on ambient and task. If you add it later, Gallery Home Lighting: Transform principles, subtle spotlighting and directional fixtures, translate well to kitchens with open shelving or displayed collections.
Best Fixture Types for Kitchen Spaces
Recessed Downlights (Can Lights) are the workhorse of kitchen lighting. They mount flush with the ceiling, creating a clean look while directing light downward. Standard spacing is one fixture every 4 to 5 feet: closer spacing reduces shadows. Recessed lights require cutting holes in your ceiling and running electrical wiring, so unless you’re comfortable working with in-wall cabling and have access to the joist bay above, hire a licensed electrician. Costs typically run $50–$150 per fixture installed.
Pendant Lights hang from a cord or chain and work beautifully over islands, peninsulas, or sinks. They provide focused task light and serve as a design statement. Pendant heights should be 12 to 20 inches above a countertop to avoid blocking sightlines while delivering enough light. If you have a 36-inch-tall island, pendants should hang around 50–56 inches from the floor. According to design professionals at Remodelista, the best pendant choices balance style with function.
Under-Cabinet Lighting eliminates shadows on work surfaces. LED strip lights are ideal, they’re affordable, dimmable, and generate minimal heat. Hardwired strips (running on a wall switch) cost $100–$300 for a full kitchen: plug-in battery-powered options are cheaper but less convenient long-term. Under-cabinet lights should be mounted on the underside of wall cabinets, 2 to 3 inches from the front edge, to light the counter without creating shadows.
Flush-Mount and Semi-Flush Fixtures are ceiling-mounted and work for kitchens without overhead space (think condos or older homes with lower ceilings). Semi-flush fixtures hang down 3–6 inches: flush mounts sit tight to the ceiling. They’re easier to install than recessed lights because they don’t require in-wall wiring or cutting large holes. Expect to pay $30–$200 depending on style.
Track Lighting offers flexibility. Tracks mount to the ceiling or wall, and individual lights pivot to highlight specific areas. Track systems are excellent if you’re unsure where task light is needed or if your kitchen layout might change. Installation is simpler than recessed lights but more complex than pendants: most require new electrical runs.
Choosing between these depends on your ceiling type, budget, and whether you’re doing new construction or a retrofit. New construction? Recessed lights are standard. Existing kitchen with plaster or older wiring? Pendants and under-cabinet strips are often the easier, cheaper path.
Choosing the Right Color Temperature and Brightness
Color temperature is measured in Kelvin (K). It defines whether light feels warm (yellowish) or cool (bluish). Kitchen lighting typically ranges from 2700K to 4100K:
- 2700K (Warm White): Cozy, inviting. Best for dining areas or kitchen tables. Less ideal for detailed prep work because warm light can make it harder to distinguish colors (especially greens and reds).
- 3000K–3500K (Neutral White): A practical middle ground. Works for general kitchen lighting and task areas. Many homeowners choose this for an approachable, not-too-clinical feel.
- 4000K–5000K (Cool White/Daylight): Bright, energizing. Excellent for task lighting because it mimics natural daylight and helps you see food colors accurately. Can feel sterile if used for ambient light alone.
A common strategy: Use 3000K for ambient and 4000K for task lighting under cabinets or above islands. This way, your general kitchen feels warm and welcoming, but work zones are crisp and shadow-free. If you prefer a consistent feel, 3500K is a safe compromise.
Brightness (Lumens) is how much light a fixture actually outputs. Watts measure energy consumption: lumens measure light. A modern LED bulb might produce 800 lumens using only 10 watts, whereas an older incandescent might need 60 watts for the same output. Always shop by lumens, not watts.
For a kitchen island or main task area, aim for 1000–1500 lumens per fixture. Pendant lights above an island often come with 60-watt-equivalent bulbs, which deliver roughly 800–900 lumens, suitable but not overly bright. Under-cabinet LED strips typically produce 400–600 lumens per foot, which is right for countertop work. Houzz’s roundup of kitchen lighting ideas shows how professionals layer warm and cool tones alongside varying lumen outputs for balanced, functional kitchens.
Always buy dimmable fixtures and bulbs. Not all LEDs are dimmable, and a non-dimmable bulb in a dimmer switch will flicker or fail early. Check packaging or ask a salesperson. Dimmability lets you adjust mood and brightness throughout the day, which also extends bulb life and cuts electric usage.
Kitchen Lighting Layout and Placement Tips
Start by mapping your kitchen’s work zones. Where’s your prep area? Your stove? Your sink? Your seating? Sketch a rough overhead view and mark these zones. Now overlay your fixture plan.
Recessed lights should be positioned to avoid casting shadows directly over work surfaces. If your sink is on the north wall and a window is to the west, place recessed lights to the east and south of the sink to light it from multiple angles. A single light source always creates shadows: multiple fixtures at different positions eliminate them.
Island and peninsula task lighting needs careful height planning. Pendants should hang 12 to 20 inches above the counter surface. Too high, and you lose directional light: too low, and they obstruct your view across the island. If you have a 36-inch-high island and want pendants 15 inches above the surface, hang them from the ceiling at roughly 51 inches from the floor. Space pendant fixtures 3 to 4 feet apart if you have multiple: closer spacing risks harsh shadows between them.
Under-cabinet placement matters more than many DIYers realize. Mount strips on the front underside of wall cabinets, not the rear. Mounting on the rear lights the backsplash and wall, not your countertop. Strips should sit 2 to 3 inches from the front edge of the cabinet to cast light across the counter without glaring directly at eye level.
Switch placement and dimming often get overlooked. Install a dimmer switch for ambient lights near your main entry and seating area. Task lighting switches can be in the same location or, for convenience, at the fixture itself (like under-cabinet lights triggered by a nearby switch). If you’re running new electrical, now’s the time to add extra circuits and switch locations. Building codes (which vary by jurisdiction) typically require one switch per 600–800 square feet of living space and a switch within 6 feet of a room’s entry.
Layering and zones are the final trick. Instead of one big switch for everything, aim for three: one for ambient, one for task, and one for accent (if you add it). This gives you flexibility and lets you dim or brighten as needed. A well-planned kitchen lets you set morning prep mode (bright task lighting), entertaining mode (dimmed ambient and accent), or late-night snack mode (minimal task light) with a few switch flicks.
Before you buy or install anything, test light positions using a flashlight or temporary lamps. Borrow pendants from a showroom, prop up a work light, or have someone hold a flashlight where you’re considering a fixture. Five minutes of mock-up testing beats regretting your choices after installation.