Table of Contents
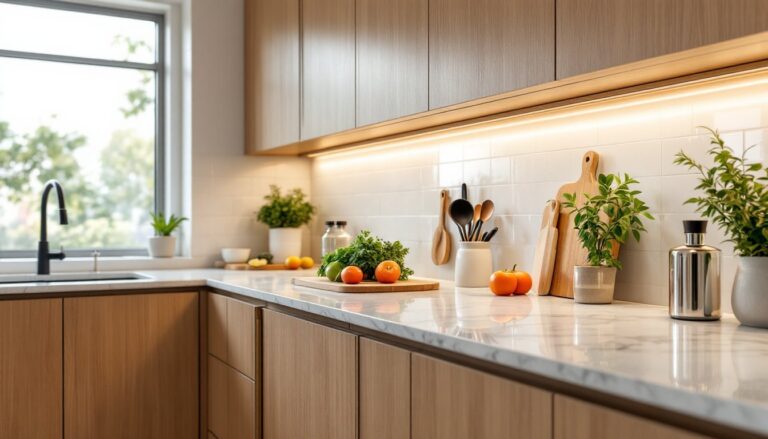
ToggleHardwired LED under cabinet lighting transforms a kitchen from dim and dated to bright, functional, and polished, without the clutter of plug-in strips or battery-powered lights. Unlike temporary solutions, hardwired LED under cabinet lighting connects directly to your home’s electrical system, delivering reliable, professional-grade illumination that lasts for years. Whether you’re upgrading an existing kitchen or starting fresh, this guide walks you through the planning, installation, and design choices that matter. It’s a project most confident DIYers can tackle over a weekend, though some jurisdictions require permits for electrical work, check local codes before you start.
Key Takeaways
- Hardwired LED under cabinet lighting eliminates shadows during food prep while consuming only a few watts per foot and lasting 15–20 years, making it a more efficient and durable alternative to temporary plug-in solutions.
- Before starting your project, contact your local building department to confirm whether permits and inspections are required, as electrical codes vary by jurisdiction and some regions mandate licensed electrician involvement.
- A typical hardwired LED strip system draws less than 1 amp, well below the 15-amp residential circuit limit, but proper planning with a voltage tester and breaker shutdown is essential for safety.
- Mount LED strips 1–2 inches inboard from the cabinet front edge and space fixtures 24–36 inches apart with aluminum channels and opal diffusers for even, professional-looking illumination without visible hot spots.
- Install a dimmer switch to transform both mood and functionality, allowing you to run lights bright during meal prep and dim them during evening relaxation while keeping wiring hidden behind or inside cabinet walls.
Why Hardwired LED Under Cabinet Lighting Is Worth the Investment
Hardwired LED under cabinet lighting delivers task lighting where you actually cook and prep food, eliminating shadows cast by overhead fixtures alone. The payoff goes beyond convenience: LEDs run cool and efficient, drawing minimal amperage and generating almost no heat, meaning lower electricity bills and less strain on your kitchen circuits. A typical 12V or 24V hardwired LED strip system draws only a few watts per foot, compared to older halogen under-cabinet lights that consumed 20 watts or more per fixture.
The durability factor matters too. LEDs last 25,000 to 50,000 hours, roughly 15 to 20 years of average daily use. You won’t be swapping bulbs every couple of years. Modern hardwired systems also offer dimming capability, color temperature options (warm 2700K to cooler 5000K), and integrated controls that work seamlessly with existing smart home setups. Once installed, hardwired lighting becomes invisible infrastructure: no visible cords, no flickering batteries, no worrying about power strips. It’s the kind of upgrade that quietly improves your kitchen every single day.
Planning Your Installation: Tools, Materials, and Safety Considerations
Before cutting into walls or running wire, measure your cabinet runs carefully. Most under-cabinet spaces sit 2 to 4 inches below the cabinet bottom, plenty of room for a low-profile LED strip. Sketch out your layout on paper, noting where fixtures will mount and how you’ll route wiring to a nearby power source or switch junction. Building codes in most jurisdictions allow residential lighting circuits to carry up to 15 amps: a typical under-cabinet LED system pulls less than 1 amp, so you won’t overload a circuit. But, local electrical codes vary significantly, some regions require a licensed electrician for any hardwired work, while others allow homeowners to do it themselves with a permit inspection.
Call your local building department before ordering materials. Explain the project, ask whether a permit is needed, and find out which code edition applies (NEC 2023 is current in most US jurisdictions). If a permit and inspection are required, treat it as a one-time investment in doing it right: inspectors catch potential fire hazards and improper wiring that DIYers might miss.
You’ll also need to decide on your power source. Some homeowners tap into an existing cabinet outlet or switch loop: others run a dedicated circuit. Hard-wiring directly to a switch (so the lights turn on and off with a wall switch) feels more integrated than a plug-and-play option.
Essential Tools and Supplies You’ll Need
Tools:
- Drill/driver with bits and hole saw (1.5″ to 2″ for routing wiring)
- Wire strippers (10 AWG to 14 AWG capability)
- Voltage tester (non-negotiable for safety)
- Needle-nose pliers
- Screwdrivers (Phillips and slotted)
- Flashlight or headlamp
- Measuring tape (25′ minimum)
- Stud finder (optional, but useful for identifying cabinet mounting points)
Materials:
- Hardwired LED strip kit (12V or 24V: full-length measurements for your cabinets)
- Romex cable (NM-B), typically 12 AWG for 20-amp circuits, 14 AWG for 15-amp circuits
- Wire nuts (appropriate size for your gauge)
- Electrical box or junction box (if connecting to existing wiring)
- Mounting clips or aluminum channels for the LED strips
- Silicone caulk (to seal gaps and hide wiring)
- Electrical tape
- Wire connector or terminal block (if your kit uses one)
Safety Gear:
- Safety glasses
- Work gloves (leather or nitrile)
- Dust mask or respirator (drywall dust if routing)
Before you touch any wire, turn off power at the breaker box and verify the circuit is dead using your voltage tester. Even experienced electricians confirm power is off before working, it’s not paranoia, it’s protocol.
Step-by-Step Installation Process
Begin by turning off the circuit at the breaker that will power your lights. Double-check with a voltage tester on any existing outlets or switch terminals. If you’re tapping into an existing outlet, unscrew it from the box and disconnect the wires carefully.
Measure the entire run of cabinets where lights will mount. Most LED strips come in 5-foot or 10-foot segments: plan to cut to length and join sections with supplied connectors. Mark mounting locations on the underside of each cabinet front, roughly 1 to 2 inches inboard from the front edge. This position hides the light source from view while spreading illumination across the countertop.
-
Route your electrical supply. Drill through the top of the cabinet (inside the cabinet box, not visible from above) to access the cavity between the cabinet and wall. Pull Romex cable through the holes, feeding it to the location where your fixture will connect. Leave 12 inches of slack at each termination point.
-
Mount the LED strip. Clean the underside of the cabinet with a degreaser (cabinet surfaces are often dusty or oily). Some LED strips have adhesive backing: press firmly and let cure per manufacturer specs. Others mount in aluminum channels secured with screws, follow your kit’s instructions. Aluminum channels help dissipate heat and protect the delicate diode array.
-
Connect the wiring. Strip about 3/4 inch of insulation from each wire end. Connect the Romex ground (bare copper) to the strip’s ground terminal: connect the hot wire (typically black) to the positive terminal and neutral (white) to the negative. Use the wire connector or terminal block provided in your kit. Tape all connections securely and ensure no bare wire is exposed.
-
Test before burying wire. Restore power at the breaker and flip the switch. Lights should come on smoothly without flickering. If there’s no power, immediately shut off the breaker and recheck connections for loose or reversed wires.
-
Hide the wiring. Once you’ve verified operation, route remaining Romex cable behind or inside cabinet sides toward your junction or switch box. Run it through walls if needed, or tack it neatly under baseboards and conceal it with wire molding. Most codes require wiring inside walls to run through studs or joists: surface-mounted Romex must be in protective conduit in living spaces.
Running Wiring and Mounting Fixtures
If you’re routing cable into a wall cavity, carefully drill through studs or blocking at a 45-degree angle through the center of the lumber, never close to edges where drywall nails or future fasteners might penetrate. This protects the cable from accidental damage. Staple the Romex to framing every 4.5 feet and within 12 inches of any box, using plastic-coated staples that won’t crush the jacket.
For a professional appearance, consider running wiring inside cabinet walls rather than exposed. This requires more careful planning but hides all cable. Alternatively, wire molding or conduit routes cable neatly along cabinet undersides and transitions to walls or switch locations. Match the molding color to your cabinets or walls, it becomes visually neutral once installed.
At the switch end, wire the circuit to an existing wall switch (if codes allow) or install a dedicated dimmer switch. Three-way switches work if you want to control the lights from multiple locations. Consult Family Handyman’s DIY tutorials for detailed switch-wiring guidance if you’re unsure, getting switch connections wrong is a common mistake.
Design Tips for Optimal Lighting and Aesthetics
Hardwired LED under cabinet lighting should feel intentional, not accidental. Start by choosing a color temperature that matches your kitchen’s overall design. Warm white (2700K) feels cozy and pairs well with traditional cabinetry, while neutral white (4000K) suits contemporary or industrial kitchens. Daylight white (5000K) is excellent for color-critical tasks like food prep, but can feel clinical in a residential space.
Dimming transforms mood and functionality. Most modern LED drivers support dimmable strips: if yours does, install a dimmer switch instead of an on-off toggle. This lets you run lights bright during meal prep and dim them during evening relaxation. Some homeowners wire separate circuits for different cabinet runs so they can dim one section independently, useful in larger kitchens.
Spacing and overlap matter visually. If you’re lighting a long run of cabinets, plan fixture placement so light pools slightly overlap without creating dark gaps. A general rule: mount fixtures every 24 to 36 inches for even coverage. In corners, stagger the mounting height slightly so light wraps around edges.
Aesthetic details often separate amateur from polished installations. Aluminum mounting channels diffuse light evenly and prevent harsh shadows. Opal diffusers (included with many kits) soften the individual LED point sources, without one, you get visible dots of light that look cheap. Caulk gaps between cabinet undersides and walls with paintable silicone caulk to hide routing and create a seamless appearance.
Consider how the light interacts with your backsplash and countertop finishes. Light-colored countertops and glossy backsplashes bounce LED light beautifully: dark countertops may absorb light and look dimmer. You can always add additional strips later if one run feels insufficient, think of it as a modular system rather than a one-shot installation. Project guides at Instructables show creative approaches to hiding wiring and layering multiple light sources.
Conclusion
Hardwired LED under cabinet lighting is a legitimate upgrade that pays off in both utility and home value. The installation requires attention to electrical code, proper planning, and careful wiring, but it’s well within reach for someone comfortable with basic electrical work and willing to verify code requirements upfront. Skip the research or cut corners on connections, and you risk flickering lights, nuisance breaker trips, or worse. Do it right, and you’ll have flawless task lighting and a kitchen that feels intentionally designed for a fraction of a professional contractor’s cost.